
Page 19 - MidWeek - Feb 2, 2022
P. 19
sticks. They are great for all ect sheet and many more at
kinds of projects and are very handy tools. But my crafter friends love them for another reason — we use them to eat our snacks, so our hands and projects don’t get dirty. I think computer users will agree, too.
benfranklinhawaii.com.
I had fun making these with some new printed cardstock designs that just arrived in the stores. And the new Dandelion Designs rubber stamps were so cute. They feature the per- fect foodie-inspired designs to
FEBRUARY 2, 2022 MIDWEEK 17
30% OFF any service
MUST MENTION AD. OFFER EXPIRES 2/28/22.
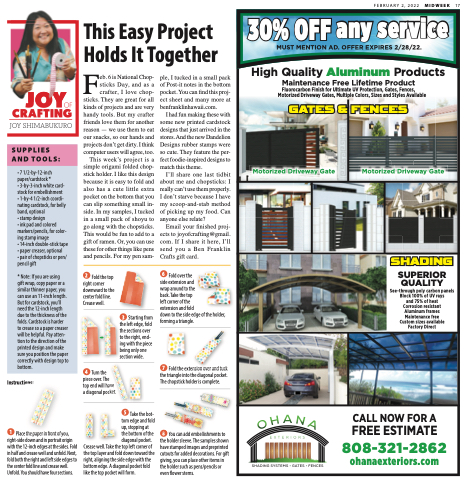
High Quality Aluminum Products
Maintenance Free Lifetime Product
Fluorocarbon Finish for Ultimate UV Protection, Gates, Fences, Motorized Driveway Gates, Multiple Colors, Sizes and Styles Available
GATES & FENCES
Motorized Driveway Gate Motorized Driveway Gate
SHADING
SUPERIOR QUALITY
See-through poly carbon panels Block 100% of UV rays
and 75% of heat Corrosion resistant Aluminum frames Maintenance free Custom sizes available Factory Direct
CALL NOW FOR A FREE ESTIMATE
808-321-2862
ohanaexteriors.com
This Easy Project FHolds It Together
eb. 6 is National Chop- ple, I tucked in a small pack sticks Day, and as a of Post-it notes in the bottom crafter, I love chop- pocket. You can find this proj-
SUPPLIES AND TOOLS:
• 7 1/2-by-12-inch paper/cardstock *
• 3-by-3-inch white card- stock for embellishment
• 1-by-4 1/2-inch coordi- nating cardstock, for belly band, optional
• stamp design
• ink pad and colored markers/pencils, for color- ing stamp image
• 14-inch double-stick tape • paper creaser, optional
• pair of chopsticks or pen/ pencil gift
* Note: If you are using
gift wrap, copy paper or a similar thinner paper, you can use an 11-inch length. But for cardstock, you’ll need the 12-inch length due to the thickness of the folds. Cardstock is harder
to crease so a paper creaser will be helpful. Pay atten- tion to the direction of the printed design and make sure you position the paper correctly with design top to bottom.
This week’s project is a simple origami folded chop- stick holder. I like this design because it is easy to fold and also has a cute little extra pocket on the bottom that you can slip something small in- side. In my samples, I tucked in a small pack of shoyu to go along with the chopsticks. This would be fun to add to a gift of ramen. Or, you can use these for other things like pens and pencils. For my pen sam-
match this theme.
I’ll share one last tidbit
about me and chopsticks: I really can’t use them properly. I don’t starve because I have my scoop-and-stab method of picking up my food. Can anyone else relate?
Email your finished proj- ects to joyofcrafting@gmail. com. If I share it here, I’ll send you a Ben Franklin Crafts gift card.
Instructions:
1
with the 12-inch edges at the sides. Fold in half and crease well and unfold. Next, fold both the right and left side edges to the center fold line and crease well. Unfold. You should have four sections.
2 Fold the top right corner downward to the center fold line. Crease well.
3 Starting from the left edge, fold the sections over to the right, end- ing with the piece being only one section wide.
4 Turn the piece over. The top end will have a diagonal pocket.
6 Fold over the
side extension and
wrap around to the
back. Take the top
left corner of the
extension and fold
down to the side edge of the holder, forming a triangle.
7 Fold the extension over and tuck the triangle into the diagonal pocket. The chopstick holder is complete.
8 You can add embellishments to the holder sleeve. The samples shown have stamped images and preprinted cutouts for added decorations. For gift giving, you can place other items in the holder such as pens/pencils or even flower stems.
e Place
t
5 Take the bot- tom edge and fold up, stopping at the bottom of the diagonal pocket.
h
e
p
a
p
p
e
e
right-side down and in portrait origin
t
h
p
a
e
r
i
r
i
n
f
n
f
r
r
o
o
n
n
t
o
t
o
f
you, y
f
Crease well. Take the top left corner of the top layer and fold down toward the right, aligning the side edge with the bottom edge. A diagonal pocket fold like the top pocket will form.
